Reviewing and Sharing Workflows
About Reviewing and Sharing
The following sections present options that help you save workflows efficiently, access the revisions you need, and keep track of workflow metadata:
- Saving Your Workflow: Explains the options for saving workflows and creating new revisions.
- Viewing Revision History: Describes how to view the revisions of a workflow and open the required revision.
- Reviewing Workflow Metadata: Describes the Documentation dialog, which lets you review workflow descriptions, tags and notes.
- Exporting Workflows: Explains how to download a workflow in XML format.
Saving Your Workflow
Save Options
The Workflow Designer provides the following options for saving your work:
- Save: Saves all changes you did to the workflow/template since the last Save action. For more information, refer to Using the Save Action.
- Save As: Saves the workflow/template you are working on as an additional workflow or template. For details, refer to Using the Save As Option.
Both options are available from the icon action bar of the Workflow Designer.
![]()
Using the Save Action
The Save action saves all changes done to the workflow since the last save.
As the Workflow Designer does not have an automatic save feature, it is recommended to save your work at frequent intervals.
If you close a workflow without saving it, a message is displayed, prompting you to save your changes.
To use the Save action:
- From the Workflow Designer's shortcut bar, click the save icon
 .
.
Using the Save As Option
This option creates a copy of the workflow or template you are building. The Save As option is useful when you want to:
- Create another workflow that is based on, or similar to, the current workflow.
- Save a template as a workflow, or vice versa.
When you use the Save As action, you have the option of creating a new revision of the copied workflow or template. When you create a new revision, the system automatically creates an additional revision of the workflow/template each time you save it. When the New Revision option is not selected, the original workflow is overwritten with the new changes, and no additional revisions are saved.
To use the Save As option:
- From the Workflow Designer's shortcut bar, click the Save As icon
 .
.
The Save As dialog opens.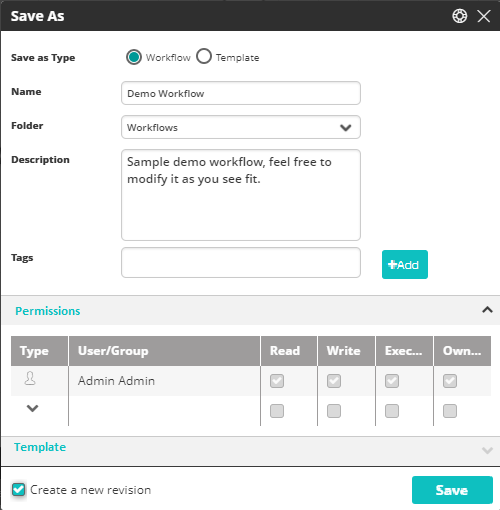
- At the top of the dialog, select whether you want to save the workflow as a workflow or as a template.
Templates can be saved as workflows and vice versa. - Use the Name and Description fields to modify the name and/or description of the workflow/template.
- Optionally, under Tags, add or remove tags.
For details about tags and how to create them, refer to Adding New Tags. - If you selected the Workflow radio button, under Permissions, assign the appropriate permissions for the workflow.
For more information, refer to Assigning Permissions to a Workflow. - Optionally, if you selected the Templates radio button, you can replace the current image used for the template. For more information, refer to Selecting an Image for a Template.
- Select or clear the Create a new revision checkbox, as required. note
In some circumstances, e.g., when the workflow is being used in production, the checkbox is pre-selected, and you will not be able to clear it.
- Click Save.
Assigning Permissions to a Workflow
Every workflow has one or more Owners and a set of permissions associated with it. An Owner is a user who manages permissions for the workflow. The set of permissions defines which users are allowed to access the workflow, and what actions they are authorized to perform on it.
The Permissions frame of the Save As dialog enables workflow Owners to manage the permissions set for the workflow. Users/Groups that have permissions to access the workflow are listed on the left side of the frame. The permissions categories for which they are authorized are indicated on the right side of the frame.
Permissions are not relevant for templates.
Permissions categories are named according to actions. The categories are:
- Read—Users are authorized to view the workflow in read-only format.
- Write—Users are authorized to view and modify the workflow.
- Execute—Users are authorized to execute the workflow. By default, these users are also automatically granted Read privileges, but not Write privileges.
If an Owner removes Read permissions from a user with Execute permissions, that user may execute the workflow only from outside the Workflow Designer. - Owner—By default, Owners have Read, Write and Execute privileges. They also may manage the permissions set and delete the workflow. By default, the creator of a workflow is the Owner.
An Owner may add and remove additional Owners and remove Owner permissions from other Owners. A workflow must have at least one Owner at any given time.
The following procedures explain how to manage the permissions set from the Save As dialog. Only Owners are authorized to manage the permissions set.
To add users/groups to the permissions set:
- From the Type dropdown, select the relevant icon (User or Group).
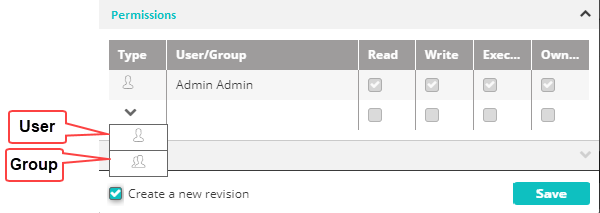
- In the User/Group column, select the required user or group from the dropdown list.
- Select the checkbox(es) of the permission(s) to be granted to the user or group.
A workflow can have more than one owner. note
Keep in mind that permissions granted to a user can be direct (permissions granted to the individual user) or indirect (permissions granted to groups of which the user is a member). For example, if a group has Write privileges, and User A (a member of that group) is added and assigned only Read privileges, User A will have both Read and Write privileges.
- To add another user or group, repeat the steps so far.
To remove a user or a group, click the X icon in its row.
Selecting an Image for a Template
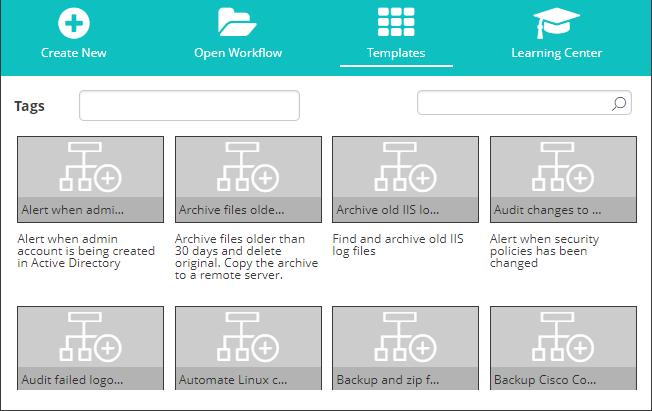
Every template has an identifying image associated with it. These images appear in the thumbnails displayed on the Templates tab of the Welcome screen. By default, a template's image is a representation of its Minimap.
The Template frame of the Save As dialog displays the currently selected image for the template, and allows you to replace the current image with one of your choice.
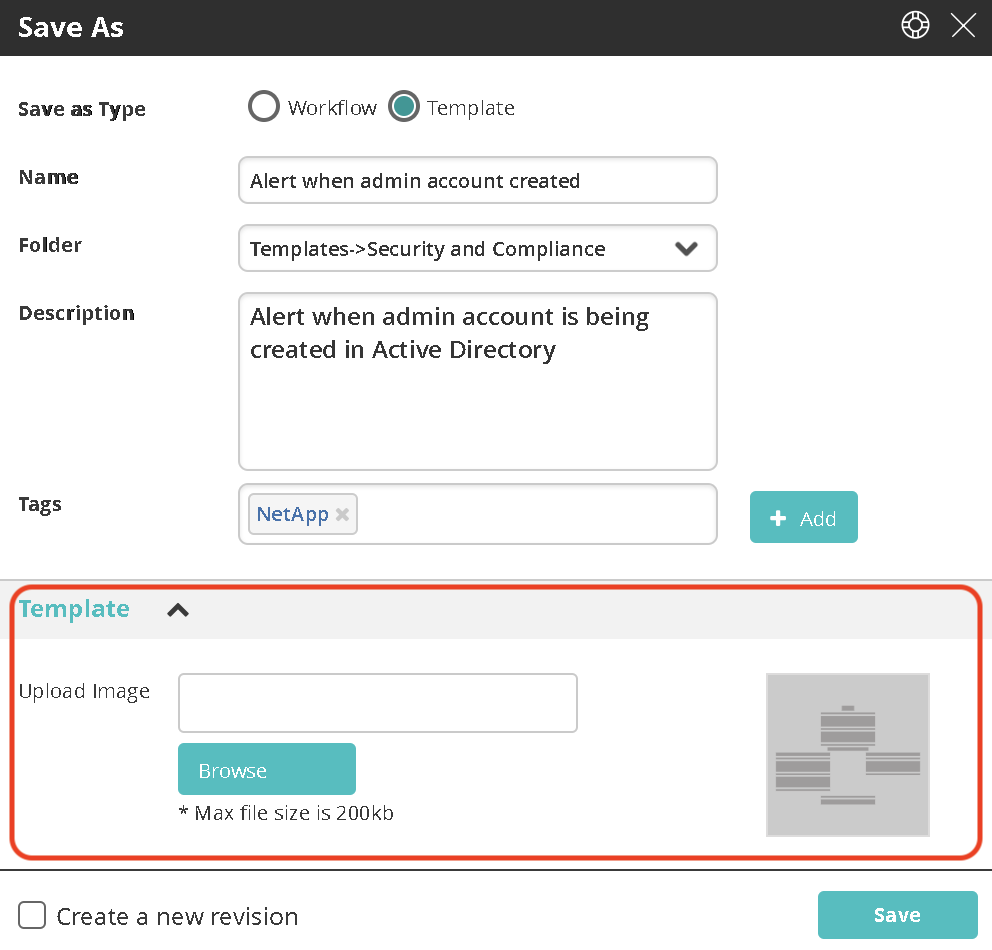
To select a new image for a template:
- At the right side of the Template frame, click Browse.
The Open dialog is displayed. - Navigate to and select the required image. Then, click Open.
The Open dialog closes, and the image in the Template frame is replaced with the selected image.
Viewing Revision History
About Revision History
The Workflow Designer provides version control by letting you create and save multiple revisions of workflows and templates. (For more information about creating new revisions, refer to Saving Your Workflow.) The History dialog provides information about all revisions of a workflow or template, and allows you to open an earlier revision in the Workflow Designer.
To open the History dialog, on the left side of the selected workflow, click the three-dot menu and choose History.
Understanding the Latest Revision
The upper portion of the History dialog always lists data about the most recently created revision. This revision is also known as the Active revision, regardless of whether or not it is currently open in the Workflow Designer.

The following data about any active revision is provided:
- Name—Name of the Active revision.
- Active—Revision number of the Active revision.
- Description—A summary of changes, or other useful information about the revision.
- Information—An additional message written in Rich Text Format (RTF).
- Tags—Keywords to facilitate organization and search operations.
- Saved—Date and time when the Active revision was last saved.
- Previous (Click the expand arrow)—Shows previous revisions, if any.
Viewing and Opening Previous Revisions
To view a list of earlier revisions, expand the Previous frame at the bottom of the History dialog. Clicking on a revision number displays data about the selected revision in the frame below.
To open a previous revision in the Workflow Designer, select the required revision, and then click Open Workflow. Note that when a revision other than the Active revision is open in the Designer, the revision number is displayed as part of the name in the workflow tab.
If you have closed the Active revision, you cannot reopen it from the History tab. Open it by selecting it from the list on the Welcome screen.
Reviewing Workflow Metadata
About Workflow Metadata
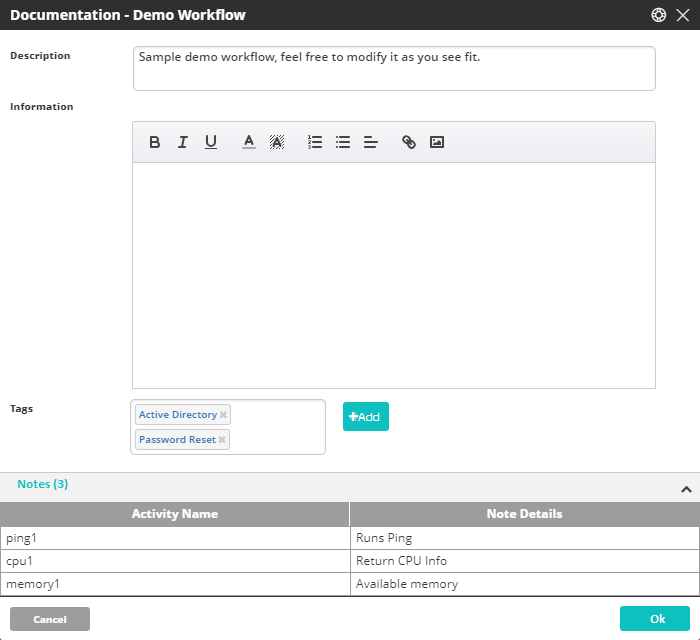
The Documentation dialog displays the following data about a workflow:
- Description and information text: Workflow summary or other useful messages about the workflow.
- Tags: Keywords that enable users to easily categorize and locate workflows.
- Notes: Information relevant to a specific activity in the workflow
Accessing the Documentation Dialog
To open the Documentation dialog, on the left side of the relevant workflow tab, click the three-dot menu and select Documentation.
Reviewing Description and Information Text
The upper portion of the Documentation dialog shows the following data (if it has been defined):
- Description: Generally summarizes the workflow purpose and provides use cases or other relevant information
- Information: An additional message about the workflow written in HTML.
To modify the description and/or information text:
- Click in the Information area and type free-text.
- Update or add text as desired. Use the standard Information icon bar to provide local formatting.
- To save your changes, click OK.
Managing Tags
Tags are keywords that help to organize and easily search for workflows. You may add and delete tags for a workflow from the Documentation dialog.
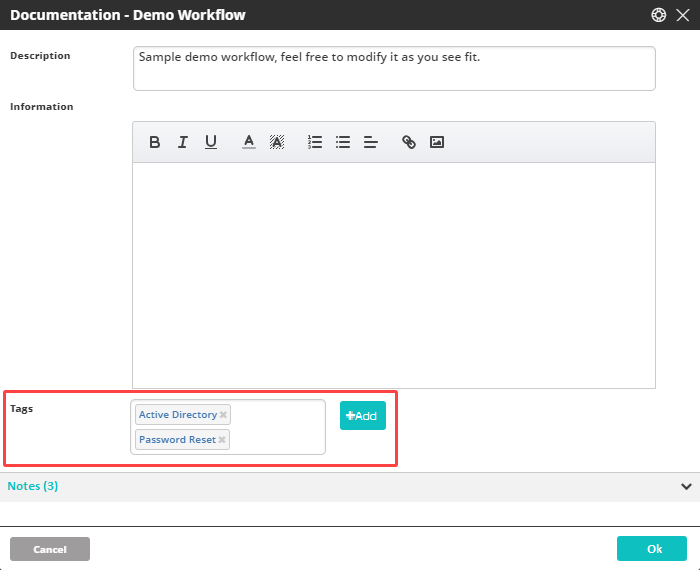
For more information about tags and how to create them, refer to Adding New Tags.
After managing tags, be sure to click OK to save your changes.
Viewing Notes
A note is supplementary information written for a specific activity or control within a workflow. For details about how to add and work with notes, refer to Editing Activities.
The lower portion of the Documentation dialog is a record of all notes contained in a workflow. The number to the right of the Notes frame title indicates the total number of notes in the workflow. The grid that follows lists the activities that contain notes (in the order in which the activities appear in the workflow), and the actual text of each note.
Exporting Workflows
The Export feature lets you download a workflow in XML file format. Use this feature to review the XML structure, share the file with others, or keep a backup of the workflow.
Export Format
The export can contain one or more workflows, stored as XML files named <Workflow name>.xml. In addition, each export contains a file named workflows_export_summary.xml. You can disregard this file when importing individual XML files.
To export a workflow from the Workflow Designer:
- Ensure that the workflow is opened in Workflow Designer.
- On the left side of the workflow tab, click the three-dot menu and select Export.
The workflow is exported to your local computer as a ZIP archive format.
To export one or more workflows from Repository:
Go to Main Menu > Repository > Workflows.
Select one or more workflows in the list.
Click the Export selected workflows icon.
The workflow is exported to your local computer as a ZIP archive format.